
Here’s the truth. Growing your email list can feel overwhelming at times. But guess what – an attractive opt-in form can often change the outcome.
Great news though. Systeme.io makes creating these forms incredibly easy. Zero coding knowledge needed. No fancy design background required. Just follow these simple steps with me.
Excited to create your very first opt-in form? Let’s get started.
The Real Importance of Your Opt-in Form
Picture your opt-in form as a virtual first impression. It’s usually the initial meaningful touchpoint someone experiences with your brand. A polished, professional form establishes credibility. A cluttered, confusing one drives visitors away.
That’s exactly why nailing this matters so much.
Creating Your First Opt-in Form
Step 1: Navigate to the Form Builder
Sign into your Systeme.io account. Find “Sites” along the top navigation menu, and “Sales Funnels” from the dropdown and select it. Next choose “Create” to begin building a fresh funnel.


A popup will appear. Select “Build an audience” for your funnel category. This is where everything comes together. Give your funnel a “Name” and if you have more than one domain, choose your “Funnel domain.” Remember to click save.

After you click on save, you’ll see the name of your funnel and the green status checkmark.

Step 2: Select Your Starting Template
Systeme.io provides multiple ready-made design templates. Scroll through the options and choose one matching your preferences. Remember – full customization comes later.
Make sure you choose “Opt-in page” and scroll through the available templates. Simply click your preferred template to proceed.

After you choose your template, create a name and URL path.

Next, click on the blue tab “Edit page.”

Step 3: Edit Your Main Headline
Your headline must capture interest immediately. Click straight on the headline area to modify it. Focus on clarity and showing clear benefits.
Upgrade your call to action: example, replace your bland ‘Join My List’ with a high-value incentive like ‘Download Your Free 5-Day Affiliate Success Roadmap’

Notice how different that feels?
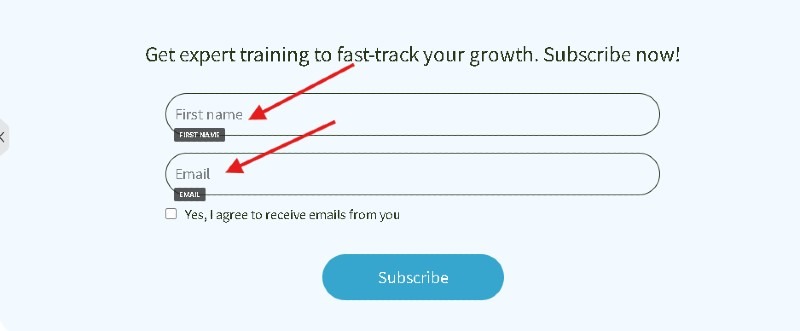
Step 4: Configure Your Input Fields
Simplicity wins here. Generally you only require two inputs: name and email address. Using fewer fields leads to higher signup rates.
Select the form component to modify its properties. Colors, typography, and field text can all be adjusted through the side panel.
Step 5: Create an Attention-Grabbing Button
Your call-to-action button is more powerful than you realize. Choose dynamic phrases like “Grab My Free Copy” or “Yes, Send It Now” rather than generic “Submit.”
Adjust the button shade so it pops against your form background. High contrast works best here.

Step 6: Set Up Your Confirmation Page
Subscribers need a destination after signing up. Systeme.io generates a confirmation page automatically. Personalize this with a brief message acknowledging their subscription.
Consider including recommended actions or an exclusive bonus here.
If you need additional help with your opt-in page: Click Here
Step 7: Link to Your Email Sequence
Access the form configuration and choose which subscriber list receives new signups. Automation workflows can also be activated directly from this section.
This demonstrates why Systeme.io excels as a complete marketing solution.
Step 8: Review and Go Live
Never skip testing before launching. Submit your personal email and verify everything functions properly. Confirm the welcome message delivers and the confirmation page displays correctly.
When everything checks out, press publish.
Essential Design Guidelines to Follow
- Include generous spacing between elements
- Keep color options to around two or three
- Ensure all text remains readable on smartphones
- Center your content around one specific value proposition
Take Action Now
Creating opt-in forms becomes natural over time. Build one basic form today. Experiment with it. Refine it. Monitor your results.
Systeme.io provides every tool you need within one platform. Zero technical frustrations. No costly third-party integrations.