Let’s be honest. When you’re just starting out with online marketing, the technical stuff can feel overwhelming. Setting up a custom domain sounds fancy and complicated, right?
It’s really not. Yes, there are a few necessary requirements and steps between the domain registrar and Systeme.io. But it’s all copy and paste.
If you’ve been using those long, clunky Systeme.io URLs for your pages, it’s time for an upgrade. Today, I’m walking you through getting your own custom domain set up. No tech degree required.
Why Bother With a Custom Domain?
Here’s the thing. Those free URLs work fine technically. But they scream “beginner” to your audience.
A custom domain builds trust instantly. It looks professional. People remember it easier. And honestly? It costs less than your monthly coffee habit.
We’re talking maybe $10-15 per year for most domains. That’s it.
Step One: Grab Your Domain from Namecheap

Namecheap is my go-to recommendation for beginners. It’s affordable and straightforward.
Note: If you prefer to use another domain name provider the steps should be somewhat similar.
Head over to Namecheap and search for your desired domain name. Keep it simple and memorable. Avoid hyphens and numbers if possible.
Found one you love? Add to cart and finish purchase. You’ll create an account during checkout if you don’t have one already.

Pro tip: Skip the extra add-ons they try to sell you. The basic domain is all you need right now.
Step Two: Access Your DNS Settings
Once your purchase is complete, log into your Namecheap dashboard. Find your new domain in the list and click “Manage.”

Look for the “Advanced DNS” tab. This is where the magic happens.

Delete any existing “Host Records” that came pre-loaded. We need a clean slate to work with.
Step Three: Create Your CNAME Record
Now we’re connecting Namecheap to Systeme.io.
Choose the “Add New Record” and from there on the dropdown choose CNAME.

Step Four: Add Your Domain in Systeme.io
Jump over to your Systeme.io dashboard. Navigate to Settings, then find the Custom Domains section.
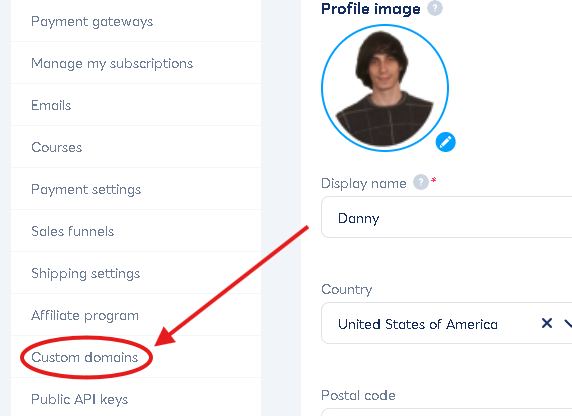
Click to add a new domain. Enter your full domain including the www portion.


Now, a DNS configuration popup will appear. It will show you two (2) CNAME records that you need to paste into Namecheap (or your preferred domain provider).

The two CNAME records in your popup should look something like this:
The First CNAME: (the following are only examples)
Your Name or Host: www
Your Target or Value: cajbbautegisee4.cloudfront.net
The Second CNAME: (the following are only examples)
Name or Host: _38gb993h5h3u2pn6fvr9x73kky87
The Target or Value: _hii84dd295gwx043m1rq8e4b.ggu8w4tvpsks.acm-validations.aws.
Important: Add the new CNAME records from Systeme.io exactly like I’ve shown above to Namecheap. (do not use the codes above)
Remember to click save.
Systeme.io will now attempt to verify your connection.
Step Five: Wait and Verify
Here’s where patience comes in. DNS changes can take anywhere from a few minutes to 48 hours to fully process. Usually it happens within an hour or two.
Keep checking back in Systeme.io. Once verified, you’ll see a green checkmark or confirmation message.
You Did It!
Seriously, that’s the whole process. Five steps and you’ve got a professional domain connected to your Systeme.io account.
If you still need additional help with setting up your custom domain: Click Here
Now you can assign this domain to your funnels, websites, and landing pages. Everything looks polished and trustworthy.
Don’t let the small technical hurdles stop you from building something great. This was one of those hurdles. And you just cleared it.
What domain name did you end up choosing?